
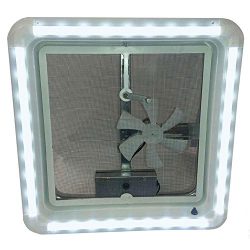
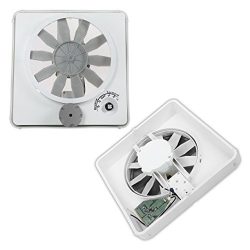
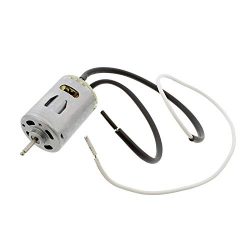
RV Roof Vent Vortex II Ugrade Kit Multi-Speed Fan
If upgrading non-powered vent 18 Gauge Wire to 12 volt DC recommended TESTING UNIT before installing you must have unit facing correct direction, face down like when installed in rv, or blade will rub DO NOT LET HANG BY WIRES – Damage to circuit board will occur. INSTALL INSTRUCTIONS Remove garnish ring from existing roof vent and save screws for re-installation Remove crank handle, screen and fan unit from existing roof vent EXISTING VENTLINE VENTS: Unscrew and move gear drive to alternate position as shown on installation instructions EXISTING JENSEN VENTS: Unscrew and move gear drive to alternate position as shown on installation instructions Hold Vortex unit near ceiling and attach Vortex wires to RV 12 VOLT POWER ONLY wires DO NOT LET HANG BY WIRES – Damage to circuit board will occur. Secure Vortex unit onto existing vent frame, making certain the crank spindle is properly aligned and seated in the matching gear drive (if necessary, use knob to rotate gears to achieve alignment) Secure gear drive spindle with screw Make sure wires are out of the way of the fan blade Attach screen frame, inserting 4 tabs and rotating clockwise until tight Attach manual crank knob with screw Reinstall original garnish ring
Product Features
- Heng’s 12 volt Vortex II Insert Fan Unit (Not Complete Roof Vent) – NO Interior Garnish Ring
- 12 Volt Power Only Multiple Speed Fan 9′ Fan Blade (3 Speeds Outward and 2 Speeds Inward) 188 CFM (188 Cubic Feet Per Minute) 1.8 amps of power required
- SCREEN Removable Fine Mesh Screen included CRANK HANDLE Manual Crank Style Handle Included (You must install this)
- **New Vortex II have a pre-stamped cut-out in the housing for the fuse necessary for Canada.** This is not a factory defect, please see photos**


Nice replacement. Id give this 5 stars But I have a couple cons:1st: is about the open circuit board on the top.So to cover the circuit board I duct-taped plastic just above it to give SOME kind of protection from misty-spray when it rains and the wind still somehow manages to get moisture inside the vent section.2nd: is the knob-handle. It definitely has issues. I liked the original cranks for the vent but it doesn’t fit the spokes of this unit and the back wall of the vent itself would…
Lacking Quality Control I like the features of multiple speeds on this fan, but was hesitant because of the wide range of reviews. I looked but did not find a multi-speed fan anywhere near this price range, so I decided to take my chance.Delivery was prompt and I proceeded to start reading the documentation. My particular old fan had a sheet metal support for the old switch that needed to be cut away (needed tin snips – fortunately had one in the tool box). With the many reviews that stated a failure to work…